PLOW Concrete 5 Website Instructions
State Library staff prepared a training video and step-by-step instructions for a range of actions on a PLOW website. Browse the instructions at the link below; if your concern or issue is not addressed there, contact your District LRT for further assistance.
Concrete 5 Training Webinar
A pre-recorded 55-minute webinar provides a tour of the Concrete 5 platform, including a demo of a new PLOW library website with a walk-though of the pages and the way they are organized, and also a brief presentation on current best practices for websites. Watch the video below.
Administrative
How to Log into Admin Account
New PLOW library websites are created as a separate and new website, different from the old PLOW websites. This is so library editors can work on their new PLOW site and get it ready to go. When it is done, or close enough to done, SILO will switch the DNS record so that https://www.cityname.lib.ia.us points to the new Concrete5 website.
Current (Plone) PLOW website: https://www.cityname.lib.ia.us
New (Concrete5) PLOW website: https://c5.cityname.lib.ia.us
- Open a browser and go to your library website address
- Scroll down to the footer
- Click on the * link in the lower right corner
- Log in with the Admin user name assigned to your site which is CitynameAdmin
- Use your actual city name + Admin.
- If your city name has two words capitalize the first word of each name, with no spaces e.g. ElkHornAdmin
- Use initial password: libraryC52020
- When successfully logged in, the name of the user will appear in the same place in the footer
- Click on this link to logout
Alternate method of logging out:
- Click Dashboard in the upper right corner
- Select “Sign Out” to exit the site
How to Change Passwords in Concrete 5
To Change Password:
- After you are logged in, click Dashboard in upper right.
- Click Members
- Click on your blue username.
- On the Basic Details page beside the word Password, click the button which says “Change”
- Enter your new password twice
- Click Update
How to add a new author
- Open a browser and go to your library website address
- Login
- From the Dashboard, click on Members
- Click on Add User from the menu bar (in the upper right)
- Enter a Username - there is no creation protocol
- Enter a Password - there are no restrictions or requirements
- Enter the user's email address
- In the Registration Data section, leave checked the checkboxes about receiving private messages
- Under Groups, make sure both checkboxes are checked: editor and Sites /
- Click the Add button (lower right)
View/Edit a User Account
- From the Dashboard, click on Members
- Click on the member's user name to look at the account
- From here you can Send a Private Message, Deactivate a User or Delete the User
Header
How to add a link to the library catalog
- Login to web site
- Click on sitemap
- Click on return to website
- Click on Edit mode
- Click on Call To Action flag in the upper right corner
- Click on Add block
- Click on Add content
- Select the Content block
- CKeditor pops open
Note: There is no text box to type in; the defined area for text in the CTA flag is very narrow
Just start typing “Catalog Search” You can see the content box grow, but you can’t see what you’re typing, so type carefully! - Click inside the CTA Block
- Carefully highlight the text "Catalog Search"
- Click on little chain icon for insert link
- Leave link type as URL
- Type or paste the URL for your online catalog in the URL box
- Click OK
- Click the save button in the editor
- Publish changes
Sometimes this process gets messed up. In that case, it is easiest just to delete the block and start over again.
How to change the color of the Catalog Search flag
After adding the link to the library catalog in the header flag, you can change the color of the flag
- Click on Edit Mode
- Click on Page Settings from the menu bar
- Click on Attributes
- Scroll down to Theme Styles
- Click on Button CTA Color
- Locate the Button CTA Color color picker in the right side panel
- Click on the Color Picker
- Type in a Hex color number (find one at W3Schools Color Picker)
- -or-
- Select a color by clicking on the color palate
- Click Choose
- Click Save Changes
Clear the Cache to see the change
- Click on Dashboard
- Click on System & Settings
- Click on the Clear Cache link
- Click on the Clear Cache button
- Wait for the cache to clear and the "Cached files removed" message appears
- Click on Return to Website
- Click on Exit Edit Mode
- Publish the Changes
How to add a logo
- In the Header area, there is a space designed to hold a graphic logo
- The logo must be already created outside of Concrete 5
- When a logo is added to the header, it will replace the name of the library in the header. Consequently, the graphic logo must contain the name of the library.
- The size should be approximately 500 x 130 pixels
- This process is easier if the logo image is already uploaded to the website. See instructions for uploading an image file.
- Login to the website
- Click on Return to website
- Click on Edit Mode
- Click on the title in the Header area
- Locate and click on "Empty Sitewide Logo5638 Area"
- Click Add Block
- Click on the Image type block
- In the Add Image popup box, under Files, click Choose Image
- Navigate to the logo image stored in the Files section of the website (if the image was already uploaded)
- Select the file
- Close all popup boxes
- Click Exit mode
- Publish the page
How to add the library address
- Click Edit Mode
- In the Header, on the right side, hover the mouse just to the left of the orange CTA flag. Look for a little gray box.
- Click the little gray box
- Click Add Block
- Click the Content type block from the list
- The CKeditor appears and the cursor is blinking right justified in the address block
- Carefully any or all of these elements:
- Library Name
- Library Street address
- Library Mailing address
- Library City, State, Zip code
- Library phone number
- Library email address
- This is a narrow space, and all text is right justified.
- As lines of text are entered it will make the header taller and push page content down the page.
- Click the Save button in CKEditor
- Click Exit Edit Mode
- Publish Changes
How to Create Slider Images Using Canva
Take these steps to create images in Canva which fit the sliding header.
- Sign up for a free Canva account
- Log in to your Canva account
- Click "Custom Dimensions" in the upper right corner under their banner on the home page.
- Enter 1200 width by 468 height
- Click "Create New Design"
- Select a free image you like from the choices on the left side
- Edit the image by typing in your own text
- Click the blue download arrow from the ribbon along the top
- Choose png or jpg
- Click "Download"
- Open the image and save on your computer
- Upload the image into your Concrete 5 image folder
Footer
How to add items to the footer
There are 4 four columns in the footer. Not all four need to be used. No more than 4 columns are allowed.
Suggestions for content:
- Library Hours
- Contact Information
- Links to internal or external pages (donations, community, schools, etc)
- Links to the library's social media sites
- Click on Edit Mode
- Scroll down to the footer and locate the 4 columns
- Click in one of them
- Click Edit Block or Add Block
- Place the cursor in the block and use CKEditor to add text, images, links, etc.
- Click the Save button in CKEditor.
How to change the color of the footer
- Click on Edit Mode
- Click on Page Settings from the menu bar
- Click on Attributes
- Scroll down to Theme Styles
- Click on Footer Background Color. This adds the attribute to the panel on the right
- Locate the Footer Background Color color picker in the right side panel
- Click on the Color Picker
- Type in a Hex color number (find one at W3Schools Color Picker)
- -or-
- Select a color by clicking on the color palate
- Click Choose
- Click Save Changes
Clear the Cache to see the change
- Click on Dashboard
- Click on System & Settings
- Click on the Clear Cache link
- Click on the Clear Cache button
- Wait for the cache to clear and the "Cached files removed" message appears
- Click on Return to Website
- Click on Exit Edit Mode
- Publish the Changes
How to add social media links to the footer
Search and find free social media icon art work. Canva has collected some links: The 30 best free social media icon sets
You will need the social media icons already uploaded as images to your website.
See instructions here on how to do that.
- Click on Edit Mode
- Scroll down to the footer and locate the 4 columns
- Click in one of them
- Click Edit Block
- Place the cursor in the block and use CKEditor
- Click on the image icon in CKEditor
- Click on the Browse Server button in the popup window
- Navigate to the file manager where the uploaded icons are stored
- Click on one icon to select it
- Click the OK button
- Continue adding the icon images until complete
- Add links by clicking on each icon to select it
- Click on the insert link icon in CKEditor
- Type or paste a URL to that resource
- Click OK
- Click the Save button in CKEditor
- Click Exit Mode
- Publish Changes
- Click the Save button in CKEditor.
Calendar and Events
How to add an event to your Calendar
- Click on Dashboard
- Click on Calendar and Events
- Click on the Add Event box
- Fill in name and description
- Fill in the More Details Link Destination if necessary. See note below.
- Click on Dates tab - choose date and time of event, choose all day if no specific time
- Choose Repeat Event if it’s a recurring event and set the options from the drop down menu
- Use the Add Date/Time button to create more date/time input options; more date options for the same title and description
- Click the Categories Tab - check Is Featured for the event to show in featured events list on front page.
- Click Publish Event
Note: Use the Link Destination to take the user to a different page other than the Event Page. This may be useful, for example, if you want to take the user to a form to register for the event.
How to add an events list to the front page
This will add an Events List Block to the left side of the front page.
Events must already be added to the Calendar.
- From the front page of the website, click Edit Mode
- Locate the 3 empty blocks along the left side of the front page
- Click in the box that says, "Empty Sitewide Sidebar Globalxxxx Area"
- Click Add Block
- From the list of Blocks, click on Event List
- In the Popup window, add these settings:
- Calendar -> Specific Calendar -> Select Upcoming Events
- Filtering -> Filter by topic -> select No Topic Filtering
- Featured Events -> Click the checkbox next to Display featured events only. Note: Use this only if you have added the tag of "Featured" to each event, otherwise leave the checkbox unchecked
- Results
- Title -> Leave as Featured Events or change the title
- Total number of events to retrieve: leave as the default or change the number which will shorten or lengthen the block
- Events to Display per page -> leave as the default 3
- Link to More Events Calendar/Page -> Click on Choose a Page and Select Events from the Sitemenu
- Click on the Add button
- Click Exit Edit Mode
- Publish Changes
How to delete one occurrence of an event in a series of events
- Click on Dashboard
- Click on Calendar and Events
- Find the event to delete on the calendar
- Click on the event to delete
- Click Delete Occurrence from the popup menu
- Click the Delete button in the verification box
- When deleting one event, all the events in the series become unpublished.
- Go to the next event in the series on the calendar and click on the event
- Click on Versions
- Select the latest version of the series
- This action re-publishes the rest of the occurances in the calendar.
- Click Reload in the popup box to refresh the calendar view.
How to delete an event
This is how to delete one, stand-alone event
- Click on Dashboard
- Click on Calendar and Events
- Find the event to delete on the calendar
- Click on the event to delete
- Click Delete Event from the popup menu
- Click the Delete button in the verification box
Blocks
What is a Block?
A block is some content or functionality you can edit from within a page in concrete5. Think of legos, these are the actual building blocks that go together to make the pages of your site. There are many types of blocks. Your concrete5 install comes with some basic blocks including the Content block, Survey, Conversations, Image Slider, etc. You can find more blocks, both free and commercially supported in our marketplace.
All your in-context editing is performed by dragging Blocks into Block Areas. These areas hold the content and functionality blocks that make up your web pages.
- Add Layout let you chop block areas into smaller columns.
- Edit Area Design lets you override the CSS for this part of the page.
If you have a layout defined by your theme, you will have two more options:
- Edit Container Layout allows you to modify the area's layout according to the predefined grid system's units.
- Save layout as preset saves the modifications as a preset for use on other areas.
How do Blocks go together to make a site?
Your site is a collection of pages arranged in a hierarchy called the site tree. Each page in your site is associated with a page type, page template, and theme. That combination of page type, page template & theme defines parts of the page which can have editable content or functionality. These are called block areas. Inside any given block area, you may have many blocks.
When you add a specific type of block to a specific block area, you have created an instance of that block.
Most pages in your site will be built out of different blocks sitting in block areas.
Block Types
Basic
- Content
- A content block is great for basic text and images. It's your bread-and-butter concrete5 block. Headers, paragraphs, and more-- if you can use a word processor, you can create and update content blocks in concrete5.
Once you add a content block to a page, rather than the usual pop up form most blocks will present you with, a toolbar will appear in your site. This is concrete5 in-context content editor. You can start typing in content, and use the various menu items to format text, add links, and add different types of content, such as images, to your content block. - HTML
- The HTML block gives you the ability to paste code directly into your page. Use this for embedded code or some JavaScript from another website. This block will never clean up the code or do any formatting on it.
- Image
- The Image block is a quick way to add images to your page. You can add images to your page using the editor in the Content block, but for a more controlled image placement the Image block can be very powerful.
- File
- Use the file block to create links to files.
Use the File Block to link directly to a file, such as a policy, or board minutes or agendas.
The files must be uploaded to the File Manager
The File Block can link to any type of file: pdf, jpg, png
The File Block can link to only ONE file
Add and stack multiple File Blocks to create a LIST - Horizontal Rule
- Use the Horizontal Rule block to add a horizontal rule to help separate content. The ultimate in elegant simplicity, this block does not pop up an edit form for you to fill out, just drop right into place.
- Feature
- The Feature block is a UI asset to quickly add a title, description, and vector-based icon together on the page in an attractive way. This block is use to simplify the task and provide a customizable icon for easy inclusion without having to resort to images.
Watch Video Demonstration
Navigation
- Auto-Nav
- The Auto-Nav block provides a tree based navigation for the website. See more information.
- Page Title
- The Page Title block is used to display the title of the page on the page, usually at the top.
- FAQ
- The FAQ (Frequently Asked Questions) block will create a group of question links that your users can click to jump to different question sections and their answers.
- Page List
- The Page List provides the ability to create a navigable list of sitemap pages in the location or sitemap level you specify. See more information.
- Next & Previous Nav
- This block provides the ability to add next / previous pagination to a set of pages. It is useful for moving through a series of pages.
- Date Navigation
- Date Navigation provides the ability to make a navigable menu sorted by a page's date. Use this to add simple blog-like navigation to a sidebar.
- Tags
- Tags are a popular way to cross search content across a website. The Tags block displays page tag attributes from the current page, or the entire site, which can be used to optionally filter pages that use those tags.
- Topic List
- Topic Lists are similar to Tags in the sense that they give you a convenient way to organize pages, only the Topic list allows you to create a hierarchy of categories to sort your pages as well. Useful for blogs.
- RSS Displayer
- This block lets you display content from another RSS feed.
- Switch Language
- This block will display the different languages your site is translated from in a drop down box. There must be languages installed.
Forms
- Form
- The Form Block gives you a fast way to make forms. All data collected by the form will be emailed to the recipient. Watch a video demonstration.
- Search
- The search block is a very basic site search that you can configure to match content. This is a simple search; it's not Google or the Intelligent Search on your toolbar. The Search block uses a simple substring search in name, description, and any blocks that have searchable content in areas that have been marked searchable.
- External Form
- The external form block compliments the built in form builder in concrete5 by providing a flexible way to build forms with PHP code.
Express
- List
- Not used on our version of Concrete 5
- Details
- Not used on our version of Concrete 5
Social Networking
- Survey
- A survey block is used to ask one question. Potential answers can be added as options for users to select as answers.
- Conversation
- The conversations block allows users to post comments to the website. It is generally used for blog posts or things where you want feedback from your users.
- Social Links
- The Social Links block provides the ability to add links to your social media pages, and will show an icon for each service.
- Testimonial
- The Testimonial block gives you all the informational fields you need to collect a good testimonial from users. It includes a photo, testimonial / bio text, name, position, and website name and link.
- Share this Page
- The Share This Page block will generate social media icons that allow users to share the current page on social media sites.
- QRT-Facebook Page Plugin
- A customized block that adds a Facebook widget to the site.
Calendar & Events
- Calendar
- A block to add multiple calendars to your site
- Event List
- A block to display events that have been added to the calendar
- Calendar Event
- A page that included details of the event, that is linked to the calendar and the event list.
Multimedia
- Page Attribute Display
- The Page Attribute Display block provides the ability to choose any of the page's attributes, such as the date formatting, the tag, and thumbnail height and width (image)and display it in the page.
- Image Slider
- The Image Slider block is used to add a responsive slideshow to your site. Slide text and links can also be added.
- Video Player
- The video block allows you to easily add videos to your page. The videos will be responsive and center aligned.
- Document Library
- xx
- YouTube Video
- The YouTube Video block allows you to easily insert responsive YouTube videos into your page just by pasting the URL into a text input.
- Google Map
- The Google Map block allows you to embed a Google Maps map in your page.
Other
- Default Button
- This is used to insert an action button such as on the Online Resources page.
- Linking Resources
- This block is a customized block used for adding links to online resources to the site.
- Icon Box
- This block is for adding blocks with icons, labels and links for navigation. These blocks use a color picker to change the color.
- Login/Logout Link
- This block is used for adding an easier way to login/logout of the site. Use this as an alternative to adding "/login" at the end of the site URL.
How to edit blocks on the front page
About the blocks
The icon blocks on the front page are intentionally designed to be used for users to find things easily and quickly on the library website. The blocks should be broad categories and link to another section on the website. Use these blocks to lead users to the answers to the most frequently asked questions. For example, "How do I get a library card?" The block could be called "Get a library card" and link to the page with the library card application. Some of the icon blocks may seem to replicate the tabs across the top, but the blocks do not have to be the same content. Think creatively and you will find all sorts of uses for the blocks.
About the design
The blocks are arranged and designed to be in a grid layout, with 3 blocks across and 3 blocks down for a total of 9 blocks. There can never be more than 9 blocks, but there can be fewer than 9 blocks all the way down to 0 blocks.
Each block can be customized for color, text, icon and link.
Make a plan
It will be easier to work on the icon blocks if you make a plan for the purpose of each block. Make a list of the items you want these to be.
Edit the icon blocks
- Login to the website
- Navigate to the front page
- Click Edit Mode
- Click on the block you want to modify
- Click Edit Block
- In the Edit Icon Box popup window:
- Change the Box Background Color by clicking in the Color Picker
- Enter a color hex number or use the color picker to choose
- Enter a URL for the Box Link Required
- Use the drop down menu to choose:
- None - no link entered | Page - an internal link to another page | External - a link to another website | Relative - a link to an anchor tag on the page
- URL Required - enter the URL of the internal, external or relative link
- Box Label Required - this is the title or the text on the box. Note: this will always display in lower case letters.
- Box Icon - Enter the name of the icon from this site: https://fontawesome.com/icons?d=gallery&s=solid&m=free
- On this site, search the 964 icons and make a note of just the name. Do not click on the icon itself.
- Click the Save button
- The changes are immediately visible
Delete an icon block
Click on the block you want to delete
Click on Delete
Move an icon block
First, make a new space for the block by deleting another block or copying it to the clipboard
Click on the block
A 4-sided arrow appears in the upper right corner of the block. Use that as a grab point and click and drag the block to move it into position.
How to add a Facebook Page Plugin
How to create a Facebook page plugin, and get the HTML code to use in an embedding tile or an embed portlet.
A Facebook page plugin is a widget that will pull in Facebook page status, and the newsfeed from a library's Facebook page.
Use this process to add a Facebook Feed to a block in the Center section of a page.
Use these instructions to add a Facebook Feed to the sidebar.
Step #1: Collect the HTML code from Facebook
- Open a browser and go to Facebook.com
- Login to Facebook and go to your library's page
- Select and copy the URL of this page. This URL should contain the name of your library in it.
- Open a new tab in the browser
- Go to this address: https://developers.facebook.com/docs/plugins/page-plugin
- Scroll about halfway down the page to Facebook Page URL
- Paste your library's Facebook URL into the Facebook Page URL box
- Enter the width and height of the widget using pixel sizes, such as 300 for width and 400 for height
- Use the checkbox options to finish designing the widget
- Click on the Get Code button
- Select the i-Frame tab
- Copy the HTML code
Step #2: Add the HTML code to a Block on the website
- In a new browser, go to your website and login
- Navigate to the page where you want to add the Facebook block
- Click Edit Mode
- Follow these instructions to add a new block
- Select HTML Block
- Paste the Facebook HTML Code in the "Add HTML" box
- Click Add
How to add a Facebook Block to the Sidebar
Step #1: Collect the HTML code from Facebook
- Open a browser and go to Facebook.com
- Login to Facebook and go to your library's page
- Select and copy the URL of this page. This URL should contain the name of your library in it.
Step #2: Add the Facebook Block to the Sidebar
- Open your library's website in a new tab or new browser
- Login and go to Edit mode
- Click on the bottom of the last block on the side bar
- Click Add Block
- Select QRT-Facebook Page Plugin
- Under Configuration: Paste the URL you collected from your Facebook Page in Facebook Page URL
- Continue the configuration settings to your preference
- The Height setting determines how much space the Facebook Feed takes up in the side bar. Start with 400 and see how it looks
- The Width setting determines how much of the column the Facebook Feed takes up. Leaving it blank sets the width automatically
- Click the Add button
How to Use the File Block
- Use the File Block to link directly to a file, such as a policy, or board minutes or agendas.
- The files must be uploaded to the File Manager
- The File Block can link to any type of file: pdf, jpg, png
- The File Block can link to only ONE file
- Add and stack multiple File Blocks to create a LIST
- Create a new page, or navigate to the page where you want to add the File Blocks
- Click Edit Mode
- Hover your mouse over the lower left corner of the preceding block until you see the add new icon
- Click on the icon and click Add Block
- Click on File from the list of Blocks
- Click on Choose File
- Use the File Manager to navigate to the folder where your files are stored
- Click on a file
- Type the Link Text that describes the file
- Click the checkbox next to "Force file to download" IF you want the file to immediately download to the user's computer
- Leave the checkbox unchecked if you want the user's browser to open the file in the browser's viewer
- Click the Add button
- Repeat steps above to continue to add links to files
- When all the File Blocks have been added, click Exit Edit Mode
- Click Publish Changes
- Test the links
File Manager
How to add a new folder, delete a folder
- Login to the website
- Click on the Dashboard (upper right corner)
- Click on Files
- A list of folders is displayed
- To open the root folder, double-click on the folder for your library's website
- Continue double-clicking on folders to open them
- Navigate to a folder to add a new folder or to add a file
- To add a new folder as a container for new files, click New Folder
- Enter a name for the new folder
- Leave the "Storage Location" as Default
- Click the Add button
Delete a Folder (you can't)
- Users do not have the ability to delete folders.
- Ask an LRT or SILO support to delete a folder for you.
How to organize, move, rearrange files and folders
- Login and go to the Dashboard
- Click on Files
- Double click on your library's files to open the File Manager
- Use the Items per page drop down menu in the upper right to display all the items in the folder. Select any number from 10-250
- Using the mouse, click and drag items into folders
- Using the mouse, click and drag folders into place
How to move files from one folder into another folder
- Right click on the file, or image
- Select Move to Folder
- Use the navigation in the popup window to select the new folder
- Expand the Website folder (ex: "Anytown Public Library") by clicking on the symbol
- Click the checkbox beside the folder you want to move the file into to check the box
- Click the Save button
How to add new files
- Login to the website
- Click on the Dashboard (upper right corner)
- Click on Files
- A list of folders is displayed
- To open the root folder, double-click on the folder for your library's website
- Continue double-clicking on folders to open them
- Navigate to a folder to add a new folder or to add a file
- To add a new file in the folder, click on Upload Files
- Drop files or click the Your Computer
- Navigate to the location of the files on your computer
- Click once on the file to select
- Use Ctrl + Click to select multiple files
- Click Open
- Click Close to close the pop-over window
How to delete files
- Login to the website
- Click on the Dashboard (upper right corner)
- Click on Files
- A list of folders is displayed
- To open the root folder, double-click on the folder for your library's website
- Continue double-clicking on folders to open them until you locate the files to delete or rename
- Hover over the image thumbnail to view a larger image
- Right click on the file name
- From the pop-down menu select delete
Dashboard
Sitemap
Every page in your concrete5 site is part of a single site tree or hierarchy starting with the root level "Home". You don't have to make your site feel like a tree to your visitors, but behind the scenes this hierarchy always exists and we use it for lots of important things like inheriting permissions.
You can manage all the pages in your site with the Sitemap tools in the Dashboard.
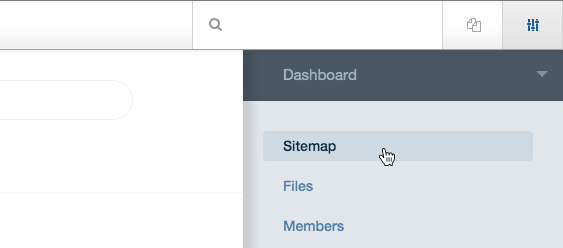
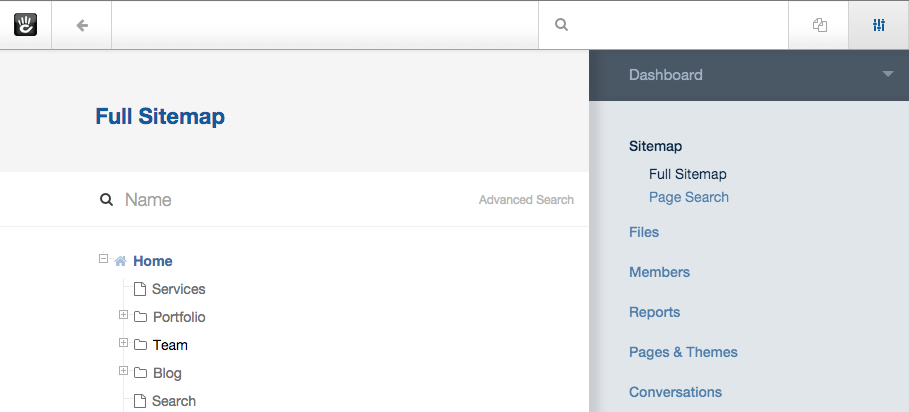
- Full Sitemap is a powerful interface that lets you look at the entire tree at once, opening and closing sections of your site as needed.
- Flat View is very helpful on huge sites. If there's thousands of pages at a single level in your site, the flat view might be much faster and more helpful for you.
- Page Search lets you find a specific set of pages.
Clicking a page name brings up this menu which maps very closely to the with various options for modifying the page.
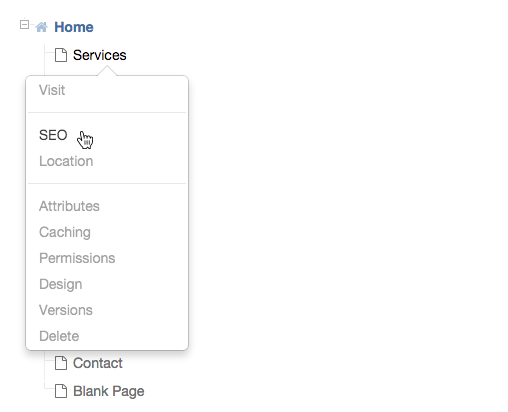
Deleting a Page
Clicking any page name on the Sitemap brings up a popover menu. If you delete a page, it will go into the Trash. Trash is not visible to regular PLOW users.
If a page was deleted by accident and you need it restored, contact the SILO Help Desk <helpdesk@silo.lib.ia.us> with the name of your library site, the title of the page and where you want it restored to. SILO admin will restore the page. Sending the request to undo a delete is best if it is done immediately upon discovering the accidental deletion.
Files
The File Manager is a tool for uploading or deleting files on a web server.
All of the assets you use in the content of your website are stored in the File Manager. Images, documents, movies - anytime you're linking to something or offering something for download, you're going to use the File Manager to pick that asset. By managing these files for you, concrete5 adds permissions, versions, custom attributes and a whole lot of other powerful tools to the mix. This is NOT a place to manage the PHP files that power your website.
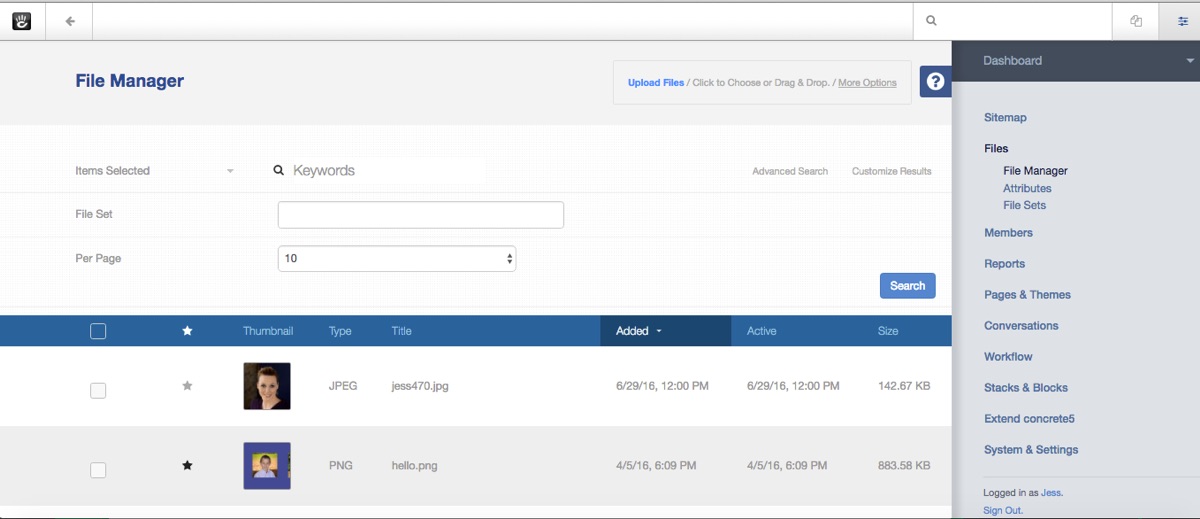
- Keywords - searches the file name and meta data available for a match.
- File Set - files can be organized into Sets. Sets are NOT a hierarchy like folders, but rather behave more like Labels where a file can be in more than one Set easily. You do NOT have to manage a folder structure for your files in concrete5.
- Per Page - Click and choose how many results you want to view
- With Selected - click a few of the check boxes next to files, or the check box in the header to select all of them. The With Selected menu will let you perform bulk actions to all of those files.
- Add File(s) - Upload a file or files by dragging and dropping them onto the page or clicking "Upload Files" and choosing the files you'd like to upload.
- Click "Upload Options" and you can FTP files into an Incoming directory on the server to import, or you can point to remote URLs for concrete5 to pull a copy of the file into the File manager for you.
How to add links to the online resources
- Navigate to Online Resources
- Click on Edit Mode
- Click on the Action button below each resource
- Click on Edit Block
- If your library uses one URL for IN LIBRARY use and another URL for REMOTE Use (i.e. user logs in from home) you can add a second link.
- In the popup window, under Link 1
- Change the Title of the button, such as IN LIBRARY
- To have the resource open in a new window, Click the drop down menu in Target and Select New Window
- Paste your library's customized URL in the URL box
- In Link 2, select External URL
- Enter a Title for the button, such as FROM HOME
- To have the resource open in a new window, Click the drop down menu in Target and Select New Window
- Paste your library's customized URL in the URL box
Brainfuse
The URLs for Iowa libraries follow this pattern
For HTTP: http://main.Ackley.p.iowastate.ia.brainfuse.com
For HTTPs: https://landing.brainfuse.com/index.asp?u=main.Ackley.p.iowastate.ia.brainfuse.com
Otherwise, contact Brainfuse support:
http://home.brainfuse.com/about-us/customer-support/
866-BRAINFUSE (866-272-4638) | info@brainfuse.com
New Pages and Tabs
How to Add a New Tab and Change the Order of Tabs
How to Add a New Tab
- Click on Dashboard
- Click on Sitemap
- Click on the folder with the name of your library. That is the "top" of the website and a page or folder added to it will appear as a tab in the top menu
- Click Add Page
- Click Empty Page
- Type in a Page Name
- Leave the Description field blank
- The URL Slug is created automatically. This becomes part of the page URL. It is also known as the 'shortname' in Plone parlance.
- Leave the Page Template as Full
- The Page Location is already filled in because of where you clicked in the Sitemap to add this page.
- Click Edit Mode
- Concrete 5 takes you back to the website with a notice about Page Draft.
- Close the notice by clicking the 'x' in the upper right corner
- Click Edit Mode
- Click in the 'Empty Main Area' box
- Click Add Block
- Select Page Title from the list of blocks
- The page title that you entered previously appears in the Custom Title Text in a new popup window
- Click Add
- Continue adding layouts and blocks to build the page
- Click Exit Edit Mode
- Publish Changes
- In the Sitemap, the new content was added to the end so the new tab is displayed at the far right in the menu bar
How to change the display order of the tabs
- Click on Dashboard
- Click on Sitemap
- Click and grab the content piece to move
- Move it up and drop it in place
- Watch for the > to appear to guide where you drop it
How to Add a New Page
- Click on Dashboard
- Click on Sitemap
- Click on the folder where you want the new page to live
- Click Add Page
- Click Empty Page
- Type in the name of the page
- Leave the Description field blank
- The URL Slug is created automaticaly. This becomes part of the page URL. It is also known as the 'shortname' in Plone parlance.
- Leave the Page Template as Full
- The Page Location is already filled in because of where you clicked in the Sitemap to add this page.
- Click Edit Mode
- Concrete 5 takes you back to the website with a notice about Page Draft.
- Close the notice by clicking the 'x' in the upper right corner
- Click Edit Mode
- Click in the 'Empty Main Area' box
- Click Add Block
- Select Page Title from the list of blocks
- The page title that you entered previously appears in the Custom Title Text in a new popup window
- Click Add
Add new blocks for content
Hover the mouse over the bottom of the Page Title box to find the Main tab
- Click the Main tab
- Click Add block
- Click the Content Block [or the image block, etc]
- Enter any text, or image
- Click Save
How to Add a Form
Add a new page to hold the form
- Click on Dashboard
- Click on Sitemap
- Click on the folder where you want the new page to live
- Click Add Page
- Click Empty Page
- Type in a Page Name
- Leave the Description field blank
- The URL Slug is created automatically. This becomes part of the page URL. It is also known as the 'shortname' in Plone parlance.
- Leave the Page Template as Full
- The Page Location is already filled in because of where you clicked in the Sitemap to add this page.
- Click Edit Mode
- Concrete 5 takes you back to the website with a notice about Page Draft.
- Close the notice by clicking the 'x' in the upper right corner
- Click Edit Mode
- Click in the 'Empty Main Area' box
- Click Add Block
- Select Page Title from the list of blocks
- The page title that you entered previously appears in the Custom Title Text in a new popup window
- Click Add
Add a new block for content
To add some text at the top of the form, such as instructions or information before the user starts the form, hover the mouse over the bottom of the Page Title box to find the Main tab
- Click the Main tab
- Click Add block
- Click the Content Block
- Enter any text
- Click Save
Add the form
Hover the mouse over the bottom of the Page Title box to find the Main tab
-
- Click the Main tab
- Click Add block
- Click the Form Block
- Under the "Add" tab: click the drop down menu to choose a field type of question for the input area
See the Form Fields Guide for definitions of each type of question
- Enter the question and fill in any other metadata
- To continue adding questions, click Add Question
- When all questions have been entered, click the Edit tab
- Use the symbol to change the order of the questions, if necessary
- Click the Results tab
- Uncheck the checkbox next to Store submitted results of form. All results must be submitted to an email address
- Click on the Options tab
- Type a message in "Message to display when completed"
- Under Email: check the box and enter an email address
- Under Files: uncheck the box next to File Manager
- Click Save
- Click Exit Edit Mode
- Publish the Form
Accessing and Using Web site Statistics
PLOW Website Use Reports
Beginning August 1, 2020 PLOW website usage statistics will be emailed to all PLOW website libraries on a monthly basis.
- PLOW Website libraries using Concrete 5 or Plone will receive this report.
- The report will list the number of visits and actions. Actions includes all activity of a visitor while on the site, including pageviews, downloads, and form submissions.
- No training is required to receive and interpret these reports.
- Individual library accounts have been disabled in Matomo in lieu of the emailed reports.
- More in-depth statistics will still be collected. If a library needs additional usage information, occasionally or temporarily, contact an LRT.
Additional Information on the Web statistics
Use these statistics to track activity on your Web site over time. Number of Visits and Pages Viewed are the most valuable. Pay little or no attention to the other statistics.
The "visits" is the total number of times your Web site is visited. A visit is counted every time a browser opens your Web site. If you have the default view of the browsers on your public access computers set to your library's Web site, every time that computer is used for browsing the Internet, your Web site gets counted as having one visit.
About Unique Visitors
This statistic shows as '0' on the report.
To protect user's privacy modern versions of the browsers are refusing the website tracker program's (such as Matomo) cookies that are needed to track them. The tracker requires cookies to stay in a browser for set amount of time, e.g. a month, but no modern browser now lets cookies stay that long simply to protect the user's privacy.
A website tracker counting "visits" use cookies that only last 30 minutes, so are much more reliable.
Libraries should focus on the statistics for "visits" and "page views".
Use these statistics to track activity on your Web site over time. Public Access Computers with the default view of the browser set to your library's Web page will skew the unique visitors and pages per visitor statistics. The only statistics that are useful to you for tracking activity over time are Visits and Pages Viewed.
Images
How to upload an image
1. Click on Dashboard
2. Click on files
3. Click on Upload Files
4. Drop image or click to upload (find image to upload)
How to add an image slider
Step #1: Create or Find an image
- The ideal size for an image in the slider is 1200 x 468 pixels.
- Use Canva to create a poster or decorative image.
- Or take a picture using a digital camera and use Paint to resize.
Step #2: Upload the image to the website
See instructions above.
Step #3 Add images to the slide show
- Login to the website
- Click on Sitemap
- Click on Return to Website
- Click on Edit mode
- Now the Image Slider is disabled
- Click on the area of the image slider and select Edit Block
- Click on Add slide
- Click on the image icon
- File Manager opens
- Use the Jump to Folder to navigate to the folder that contains the image
- Click once on the image to select it for the slider
- Optionally, enter a title (this will show on top of the image in the slider)
- Click on the Save button
- Click on Exit Edit Mode
- Publish Change
How to delete images from the slide show
- Follow steps 1-5 above
- Click on the area of the image slider and select Edit Block
- Click on the Remove button next to any image to delete it from the slide show
- Click the Save button
How to re-order the images in the slide show
- Follow steps 1-6 above
- Click and hold on the 4-sided arrow "grabber" next to an image
- Holding down the mouse button move the image up or down the list to change the order
- Click the Save button
Edit the Image Slider
- Follow steps 1-6 above
- Click the Options tab in the popup window
- Use the settings on this page to change the Navigation button, the slide duration, and the slide transition speed
- Check the check boxes to Disable the Automatic slide show or Pause the Slideshow on hover
- Change the maximum slide width by entering a pixel size
- Note: This change affects all images in the slide show
The Blue Swoosh - how to turn it off and on
- Follow steps 1 - 5 above
- Click on Page Settings
- Click on Attributes
- Scroll down to Theme Styles
- Click on "Turn off slideshow swoosh images" ; it will then be highlighted and the attribute added to the work area on the right
- Click in the right panel and scroll down to the setting for "Turn off slideshow swoosh images"
- Check the checkbox to remove the swoosh from the slideshow
- -or-
- Uncheck the checkbox to display the swoosh around the slideshow images
- Click the Save Changes button
- Click on Exit Edit Mode
- Publish changes
How to use image blocks to add multiple images to a page
This process uses the image block to add multiple images to the page.
- Upload the image file using the File Manager
- Navigate to the page where you want to add the image
- Click Edit Mode
- Hover over the bottom of a block that is already on the page
- "Main" will appear
- Click on Main
- Click on Add layout
- Change the number of columns. This forces the image blocks to appear horizontally across the page
- Click the Add Layout button
- Click in Empty Column 1
- Click Add Block
- Select the image block from the Contents area on the left
- In the popup box, click Choose Image
- Select an image from the list of files
- Fill in the rest of the metadata in the popup box
- Continue adding more image blocks in each of the columns
- Click Exit Edit Mode
- Click Publish changes
To change the image in an image block
- Click on the image
- Click Edit Block
- In the popup box, click on the image
- Click Choose New File
- Select a new image from the list of files
- Fill in the rest of the metadata in the popup box
- Click the Save button
To delete an image delete the entire image block
- Click on the image
- Click Edit Block
- Click Delete
How to add an image in the text block
- Upload the image to the File Manager
- Navigate to the page or create a new page
- Click Edit Mode
- Add or edit a text block to insert text
- Click on the Insert image icon in CKeditor
- Click on the Browse Server link (it is located next to the URL box)
- Use the File Manager to navigate to the location of the image file
- Click once on the image to select it
- The Preview will show how the image will be inserted
- Use the settings to adjust
- Click on the Lock Ratio icon to constrain the image size ration
- Enter a pixel size in Width and/or Height
- Enter a pixel size to add a border, horizontal space and vertical space around the image
- Set the Alignment to right or left relative to the text
- If the Alignment is not set the image will display above the text
- Click on the Link tab to insert a URL to an external link
- Click on Browse Server to insert an internal link